 The kitchen is one of the most important rooms in any residential building. For greater convenience, it is possible to arrange a kitchen cupboard or sideboard, including one made by yourself. A cupboard is a cupboard with shelves and a closed lower compartment, it is not just another set of additional shelves, but a whole design and practical solution for the kitchen. The modern market offers many options for buffets to choose from, but still the problem is to choose the right one in size and the right one for design, so kitchen cupboards are often assembled by hand.
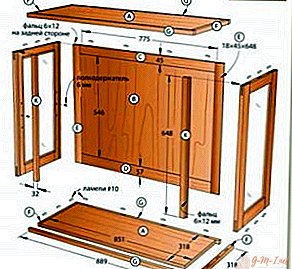
How to make a wooden sideboard with your own hands
Such functional furniture stands out among the purchased: it is possible to independently choose the material and texture, choose the right color, design and appearance, make a buffet that is perfect and fits into the overall style of the kitchen. Another advantage is the ability to make a buffet that is ideally suited for the dimensions, and purchased furniture cannot offer a variety of sizes.
Important! To decorate the new sideboard, you can use various styles: painting in an unusual color, modeling, unusual glass. For the upper open part, it is better to pick up beautiful dishes, and hide the pots and pans in the lower drawer.
The buffet will fit well into any interior. This can be an antique buffet, carved from real wood, or modern buffets in a simple and concise form.
Materials and Tools
A variety of modern building materials allows you to choose any convenient material, based on financial capabilities and personal preferences. The most popular in the work are:
Fiberboard
The material is resistant to high humidity, durable, affordable and relatively easy to process. It is mainly used for the rear walls of cabinets, hanging cabinets and drawers, without deforming and holding firmly on the fasteners. The simplicity of this material allows you to experiment with it, and the lightness allows you to reduce the weight of the finished buffet.
Chipboard
A convenient material with a diverse pattern on the surface is widely used for furniture. It is strong enough, lightweight and easy to use, sturdy and, thanks to its structure, repels water. It’s easy to work with, it holds the cut shape well and is convenient when cutting and assembling, holding nails well. However, finished furniture must not be installed near sources of heat. Otherwise, the release of harmful substances into the air from the compressed resin can lead to allergies and diseases.
MDF
The widespread use of this environmentally friendly material is due to its advantages: moisture resistance, beautiful structure. The principle of its creation is similar to particle board, but is created from better materials and is not afraid of being close to heat. The only drawback is the relatively high price. MDF holds its shape well and can be used to create decorative elements.
Solid wood
Ideal material for creating similar furniture. It is environmentally friendly, and the properties can vary due to the choice of different varieties of wood, which also differ in physical properties. For a buffet, pine, larch or oak are best suited. Natural wood looks much better, but the cost will be relatively higher. To save money, you can assemble a buffet using various materials and use wood for facade parts, and create shelves and a back wall from cheaper analogues.
In addition to the material for cutting, you need a set of tools. There are no special mechanisms and devices; they are found in everyone:
- drill;
- screwdriver;
- wood drills;
- roulette;
- duct tape;
- pencil for drawing;
- vise;
- sanding machine;
- milling machine;
- polished sheet;
- varnish coating;
- drawing.
The drawing is made in advance and contains all the necessary dimensions, the number of units, the thickness of all materials and their quantity. The drawing allows you to calculate everything in advance and get the right amount of sheets and cut.
How to make measurements
So that at the end of work there are no extra materials left or, on the contrary, there is no shortage, all necessary measurements and initial calculation are carried out before work. To do this, use a drawing with the calculation of the height and width of the product and all elements: shelves, doors, etc.
- Sketching a kitchen wall or corner on a piece of paper will always allow you to keep before your eyes an image that can be considered voluminous. It is also necessary to sketch all the elements located there: sockets, pipes, other furniture that cannot be moved away.
- Careful measurement of all possible distances with their inclusion in the drawing: the ceiling may not be perfectly even, so height measurements need to be carried out in at least two places. The desired depth of the chest of drawers is noted with additional consideration for the thickness of the doors and rear wall. The height of the dresser should take into account the fact that during installation it will be necessary to raise and not damage the ceiling.
- At this stage, the calculation of the opening of the doors, the dimensions of the protruding parts of the decoration and the height of the countertop of the chest are made. Control measurements of the chest of drawers are applied to the drawing and a general check is made: the chest of drawers must take into account the height of the ceiling, must not close the window and, when using chipboard, should not be near the battery.

Important! Measurements should be recorded in millimeters.
Buffet by yourself: step by step instructions
After carrying out all the necessary measurements and cutting, the assembly of the buffet is carried out in the following order:
- Procurement of large elements: marking of the side walls, back wall, lower part, etc. At this point, all parameters are taken into account according to the drawing.
- Preparation of smaller parts of the buffet, preparation of side parts for fastening, holes for assembly, connection of partitions and main parts using fasteners.
- Mounting the housing and installing parts of the inner part using screws and corners, assembling the parts of the base according to the drawing.
- Placement of the front plate with ledges for the doors and rear panel.
- Assembling the back wall, the canvas is fixed at the back and for convenience, the finished buffet can be laid to one side.
- Installation of hinged parts: hinges, doors, additional design elements.
- Installing furniture in its place and checking the overall assembly for installation quality.
- Decoration: installation of door handles, coating or decoupage.
Important! Professionals advise using a depth gauge, this will not spoil the wall through drilling through.

Important! For convenience and to avoid errors, it is recommended to number and mark the details.
Assembling a cupboard at home is not as difficult as it might seem at first glance. Careful measurements, selection of material and arrangement of the workplace will help create a home-made furniture element that fits perfectly into the interior.
Leave Your Comment